Showing posts with label Chocolate Baroque. Show all posts
Monday, May 12, 2014
Hot Pinks and Orange #140
I seem to be in a bit of a pink and orange phase at the moment - whenever I dive into my box of Distress Inks, I seem to gravitate towards Spiced Marmalade and Picked Raspberry.
I created this piece using the Chocolate Baroque Wild Meadow stamp set - a firm favourite of mine. The greeting is from the Chocolate Baroque Artistic Affirmations set. I've used a clock mask in teh background and stamped in dark shades of archival and Versafine inks to give that silhouette effect. A final bit of white and black highlights adds the finishing touches!
happy crafting
Jane
www.aldridgecrafts.co.uk
Sunday, May 11, 2014
Stamping Workshop #139
I've had such a great day today at our all day stamping workshop. This lovely deer card was my creation for today (I was too busy teaching to finish my other project!). This deer stamp is a Stacey Stamp. I've stamped in archival black and coloured using Cosmic Shimmer Drawing Inks. The background has been created using the Tim Holtz Shattered Mask and Gathered Twigs and Spiced Marmalade Distress inks. It has all been mounted onto an 8x8 card blank.
These are the fabulous creations of Laura and Lisa who joined me at today's workshop..
Aren't they fab!
![]() |
| Lisa's Steampunk card (Creative Expressions Stamp) |
![]() |
| Lisa's Daisy Card (Stampendous Jumbo Daisy Stamp) |
![]() |
| Laura's Lighthouse card (Crafty Individuals stamp) |
![]() |
| Laura's Peacock card (Chocolate Baroque Stamp) coloured with Cosmic Shimmer Watercolour Paints |
hope you got to have a crafty day too
Jane
www.aldridgecrafts.co.uk
Monday, May 5, 2014
Scottish Wedding #133
It's one of those long put off tidy up and sort out days here today... finally tackling reorganising all the spare beadstock as they get a little disheveled over time! So I've rummage through my archive for today's card as I had no crafting time today.
I was asked to make a wedding card for a friend for a Scottish Wedding card. I thought the thistle from the Chocolate Baroque Wild Meadow stamp set would be perfect.
I started by stamping the two thistles and coloured them with coloured pencils. I then mounted onto a pretty lilac card and the black mount.
The paper and the greeting are both from Lily of the Valley and the final accent of the lilac gingham ribbon I think finishes the design nicely.
It's nice to look back over past creations, gives you some new ideas of old favourites you can revisit and revitalise with your new techniques
happy crafting
Jane
www.aldridgecrafts.co.uk
I was asked to make a wedding card for a friend for a Scottish Wedding card. I thought the thistle from the Chocolate Baroque Wild Meadow stamp set would be perfect.
I started by stamping the two thistles and coloured them with coloured pencils. I then mounted onto a pretty lilac card and the black mount.
The paper and the greeting are both from Lily of the Valley and the final accent of the lilac gingham ribbon I think finishes the design nicely.
It's nice to look back over past creations, gives you some new ideas of old favourites you can revisit and revitalise with your new techniques
happy crafting
Jane
www.aldridgecrafts.co.uk
Saturday, April 26, 2014
Blingy Butterfly #124
I've scheduled today's post as I'm off at Stamford today providing a craft stall and make & take at a Lacemakers Guild. This is the project that we'll be making. This is a lovely little card design that I've used many times as you can adjust it so easily to suit your own stamps. It works very well too with flowers - and not just stamps but die cut ones too.
I started with cutting a card blank - size it to suit your envelopes (allowing room if you plan to stick your flowers/butterflies off the edge of the card). I like to make these on a vertical fold card. I started by stamping my butterfly - a Woodware set called Bubble Butterflies. These are such a versatile design and they are also available as a peel-off sticker too! You can colour the bubbles with whatever you like - Promarkers, Stickles, Liquid Pearls, Sakura Pens or use Large Gems or Card Candii - or a mixture of everything!
Before I decorated it I cut out my butterfly shape. I then used a mixture of everything to decorate is sticking to my blue, green and red theme.
I stamped the Chocolate Baroque Floral Edges border in Versafine Blue and then the Amazing Greeting (Saluations set from Woodware) in Versafine Green I tied a blue ribbon around the top of my card.
Once dry I stuck my butterfly onto my card.
here is another variation of the same design....
happy crafting
Jane
www.aldridgecrafts.co.uk
Friday, April 11, 2014
Purple Panel #109
Still playing with Misters and inks in today's creation. I've used really vibrant shades this time. This was the backround I created showing my workshop ladies how to use the misters and masks... so I'm afraid I didn't note the colours!... but there look like some fully purple in there I think!
Loving the colours on this piece - and I wasn't sure if the stamped designs might get a little lost in the colour - but no, I was really happy with just a couple of stamped designs - the words from Chocolate Baroque Artistic Affirmations and the butterfly is the Zentangled Butterfly from Woodware.
there are some masks in the background too - some swirls and the clock face mask too.
I've also stamped some swirls in the background too!
There was so much happening with this piece I thought just a few white highlights and a white border for a change was all it needed.
the colours are fab - it's already up on the gallery wall in the shop if you want to have a look!
So excited to be having our birthday celebrations tomorrow - I can't quite believe we've been open for 2 years now and I absolutely love love love working with my great friend Sarah in our fabulous shop. happy happy times!
I'll post tomorrow all about our day... I'll try and take lots of pics if I can!
happy crafting
Jane
www.aldridgecrafts.co.uk
Wednesday, April 9, 2014
Bright Birdy #107
This is the second of the samples I created for my workshop on Monday. This one was to show the look of the Distress Stains.
I started by working with yellow, blue and red tones of Distress stains - adding blotches of colour. I then generously spritzed it with water and used a cloth to blend some of the colours. Go gently - your card surface is saturated with water so easily damaged. Dry your card with a heat gun and then apply some more ink through masks to add some background patterns (this time I used the distress ink pads rather than the stains so I could get a more specific position and definition. i also did some outlining of my mask using a white gel pen too to add some different dimension. Next I stamped my main image - which is a Crafty Individuals stamp (Tea at Three). I then added lots of highlights using my white gel pen, including mirroring the border which I did again with a black fineline. I stamped my wording (Chocolate Baroque Artistic Affirmations) and then the swirls from the same set stamped in blue and yellow ink to add some extra detail.
finally I added a dash border with my fineliner and the gem accents.
Loving the colours on this piece!
happy crafting
Jane
www.aldridgecrafts.co.uk
Shop for Crafty Individuals Stamps
Shop for Distress Stains and Inks
Saturday, April 5, 2014
Elephant Gothic Arch
We've recently added a new range to the shop - a fantastic range of chipboard shapes and kits from Tando Creative. This Gothic Arch Frame kit comes with a back piece then all the frames and inner pieces separate so you can decide what you want to create with the project. I decided to make the full frame up.
I started with the back piece and painted with gesso. I then decided to add a dictionary page, once stuck down and dry I inked up with Distress Inks - Scattered Straw, Aged Mahogany and Ripe Persimmon. I like working onto the script page with distress inks - it gives a different effect than just plain cardstock.
I next built up my frame - sticking each layer together with PVA glue (not attaching it to the base just yet). Once dry, I painted the whole frame with gesso and then with Art Proff crimson shade paint.
I thought the Chocolate Baroque Indian Elephant stamps were ideal for this project and all the stamps I've used are from that set. I used the little flower stamped into gesso as my 'ink' to stamp around the frame. I then added gold liquid pearl dots and sprinkled with a little yellow glitter to sink in whilst it dry. I then put this aside while I worked on the main panel.
I stamped the flower using archival black onto the back panel and then took time to outline the flowers with white gel pen.
I then stamped the elephant on a separate piece of card and inked up with the same distress inks but a lot more emphasis on the yellow shades so he would stand out from the background. I cut him out as carefully as I could and then stuck him down, taking care to place the frame over the top to make sure you can clearly see the design. I next stuck the frame down onto the back using PVA glue.
Now time to add the highlights to the elephant. I did lots of outlining with the Liquid Pearls gold and again sprinkled with the yellow glitter. make sure to leave the glitter in place until the liquid pearls are dry before trying to remove the excess.
I just love these kits and I definitely plan to make more samples - great fun - and I've still got the middle panels from this kit to play with yet!
happy crafting
Jane
www.aldridgecrafts.co.uk
Shop for the Tando Creatives Products
Friday, April 4, 2014
Citrus Butterflies
This is the last card I made for the citrus themed Chocolate Baroque colour challenge. The background is Cosmic Shimmer Misters - Mango Blaze, Golden Mint and Pastel Yellow Chalk.
I've stamped using Distress Ink Squeezed Lemonade and the harlequin background from Chocolate Baroque's Decorative Edges set. I've then stamped the floral swirl from Chocolate Baroque's Butterfly Flourish Swirls set using Ripe Persimmon.
I stamped the main butterfly flourish using Archival Black and then stamped again onto another piece of card so I could colour the butterflies with the same misters and added some highlights with Orange Peel Stickles. I cut out the butterflies once dry and mounted over the top of the design. I added white gel highlights to the swirls.
The wording is from the Artistic Affirmations set and the border is hand-drawn with a fineliner pen with a white line for contrast.
happy crafting
Jane
www.aldridgecrafts.co.uk
Join us on our 2nd birthday celebrations on 12th April in store we'll have demonstrations, special offer prices and a prize draw! 10-4pm.
shop for Chocolate Baroque Stamps
Shop for inks
Thursday, April 3, 2014
101st post...... A little flowery....
I've only just realised that yesterday was my 100th daily post since starting posting a creation a day just before Christmas. When I started I wasn't sure if I could keep up with the schedule... but apart from the odd days (fortunately I have a large archive of stuff I've made and I can dip into on an emergency!)... and I've found it a pleasure to keep up with. Even better, the shop now looks so much brighter with a new supply of samples to inspire too!
Today's creation is another play with my Chocolate Baroque stamps for their colour challenge. The background is Cosmic Shimmer Misters - Pastel Chalk Yellow, Mango Blaze and Golden Mint. I've added some dot details using Distress Ink Ripe Persimmon through a mask.
The words are from Chocolate Baroque Artistic Affirmations. I'm not sure which set the flower is from - but I've stamped out onto the same background and added some shaded with the ripe persimmon. I added some white gel highlights to the middle flower and then a large gemstone on the top (these are lovely - a new larger gemstone size we've just got in stock). The swirl in the background is actually the flower swirl stamp from Chocolate Baroque Butterfly Flourish Swirls set.
I'm not a big one for adding flowers to my cards - but really liked the finished simplicity of this one - hope you do to!
happy crafting
jane
www.aldridgecrafts.co.uk
don't forget our Tattered Lace Die Prize Draw is still on - one entry for every individual Tattered Lace Die purchased online or instore before midnight 11th April for our prize draw to win a Tattered Lace die of our choice!
Shop for chocolate Baroque stamps
Shop for Cosmic shimmer Misters
Shop for Distress Inks
Wednesday, April 2, 2014
a little blue, green and red....
This is another of the Chocolate Baroque Facebook Group's colour challenges. I've long wanted to have a go at colour blocking with these Chocolate Baroque Wild Meadow stamps - and the colour challenge was an ideal opportunity.
I used low tack tape to mask off my card so only 3 rectangles showed.
I used Distress Ink Salty Ocean, a mix of Distress Ink Peeled Paint and Memento Cottage Ivy and then Distress Ink Fired Brick for the 3 panels.
I then removed all the masks except the one at the botton and stamped using Archival black - stamping a mix of flowers from the Wild Meadow set - and the little butterfly.
I then used a green pencil to add some foliage colour and then added my main colours using quickie glue pen and different coloured glitters - a red, a pale blue and a bottle green for the highlights and a pale leaf green for the foliage. I added a few white gel highlights - particularly on the green panel to get the stems to stand out from the background and then finally removed my tape from the bottom
A really effective technique to try!
happy crafting
Jane
www.aldridgecrafts.co.uk
Join us for our 2nd birthday celebrations in store on 12th April - 10-4 - for demonstrations, special offer prizes and a prize draw!
Shop for Chocolate Baroque Stamps
Shop for Inks
Tuesday, April 1, 2014
A touch of yellow, green and orange....
I'm part of the fabulous Chocolate Baroque Facebook Group - if you are a Chocolate Baroque fan - it's a great group to be part of as you get so much inspiration on how to use their stamps. You can post your creations to share with the group and this week they have some colour challenges that got me creating!
here's my first for the yellow, green and orange challenge. The background is Cosmic Shimmer Misters - Mango Blaze, Golden Mint and Pastel Chalk Yellow.
The scene stamp is Chocolate Baroque Landscape Edges and the Happy Place wording is from Artistic Affirmations set.
I've stamped them both in Archival Black and then added some white gel pen highlights and a hand-drawn border with a black fineliner.
I've enjoyed working with this colour mix... more to come later this week!
Always fun to go with challenge colours - why not give it a try?
happy crafting
Jane
www.aldridgecrafts.co.uk
Shop for Cosmic Shimmer Misters
Shop for Chocolate Baroque Stamps
Monday, March 24, 2014
Bright and Flowery
In contrast with yesterday's muted brown tones, today's is all punch and pizzazz! I stamped the floral border (Chocolate Baroque Floral Edges Set) - using Black archival around the three edges. I then used a mixture of watercolour pens such as Marvy Le Plume, Whispers etc to colour directly to paper with. I picked out the brightest colours I could find in vibrant pinks yellows and oranges.
to add some contrast I used a mint green shade in the centre so the other colours would pop out.
A final greeting which is from the Woodware '21' stamp and a little ribbon after it had been mounted onto a black border was my finishing touch.
Nice and bright!
happy crafting
jane
www.aldridgecrafts.co.uk
Shop for Chocolate Baroque Stamps
Sunday, March 23, 2014
Little Brown Bird
This lovely little chap is another stamp from the stamps that come free with issue 16 of Creative Stamping. I started by painting the tag with an antique white and a pale brown shade of acrylic paint using vertical brush strokes so that they were visible and part of the background texture.
Next I stamped using the script from Tim Holtz Royal Script stamp using Versafine Smokey Grey ink, I also stamped the crowns in a couple of places too.
Next I stamped the Chocolate Baroque harlequin border stamp (from Decorative Edges set) using Walnut Stain Distress Ink. I then left aside to dry.
I stamped my bird and watercoloured using Walnut Stain, Mustard Seed, Picked Raspberry and Aged Mahogany distress inks and cut him out as close as I could .
I stamped all the greetings from the magazine stamps using black stazon and added the easter egg border and the music border top and bottom from the same set. I then fixed my bird over the top.
I like all the muted brown shades on this one!
happy crafting
Jane
www.aldridgecrafts.co.uk
shop for the Creative Stamping magazine
Shop for Stamps
Shop for Inks and Paints
Saturday, March 22, 2014
Bright Owl
I love to create really vibrant bright backgrounds and then see what I can make with them. This card started with Alcohol Inks - dropped in big drops and then spritzed with Stazon cleaner to add speckles and muted areas. The background has also been stamped with a flourish design using plum Archival to give a bit of pattern
I then chose this gorgeous owl from Chocolate Baroque and stamped him in Archival Black ink. A few elements were then traced with white gel pen so he really stood out from the background.
The wording is also from Chocolate Baroque, and again, I've outlined with pen. It was such a busy background without it even the bold black stamp wasn't enough to make it stand out.
Lovely and bright!
I had a lovely day today chatting to crafters and customers at a Craft Fair - always such a sociable occasion!
I'm going to have to be organised tomorrow - I need to create my sample board for my demonstrations at Sincerely Yours Thetford on 30th March... and make two blog projects too... a creative day lined up for me I think!
I hope you get to fit in some crafting this weekend.
happy crafting
Jane
www.aldridgecrafts.co.uk
Tuesday, March 11, 2014
Little Black Dress
This is another creation from Saturday's Demo. I started with a sprayed background - Cosmic Shimmer Ink Misters - it looks like Red Firefly with a bit of gold (it's from my stash box - must remember to write the colours on the back!)
I've used the Chloe dress and applied translucent paste through it. I've then covered it completely with black glitter. I wanted to use the translucent rather than the black paste to show that the dark glitters cover it - you don't need a dark paste for a dark glitter.
I stamped the art deco style border using my new set of stamps from Chocolate Baroque (I've wanted these for ages!!) - Decorative Edges. The scribbled border is just hand-drawn using a black fineliner pen... I've noticed my hand-drawn borders lately seem to be resembling barbed wire!! obviously the country influence here in Norfolk! :-)
It's been mounted onto an 8x8" card blank with just a fine black border.
Had a very proud moment today... I didn't realise that when we were runner up for the best craft retailer for East Anglia that we would get a certificate to be able to let everyone know... well it arrived in the post today! It will have pride of place! Thank you so much to all the customers who voted for us! happy times :-)
happy crafting
Jane
www.aldridgecrafts.co.uk
Shop for Stencils (including Sweet Poppy)
Shop for Chocolate Baroque Stamps
Monday, February 17, 2014
What a Colour
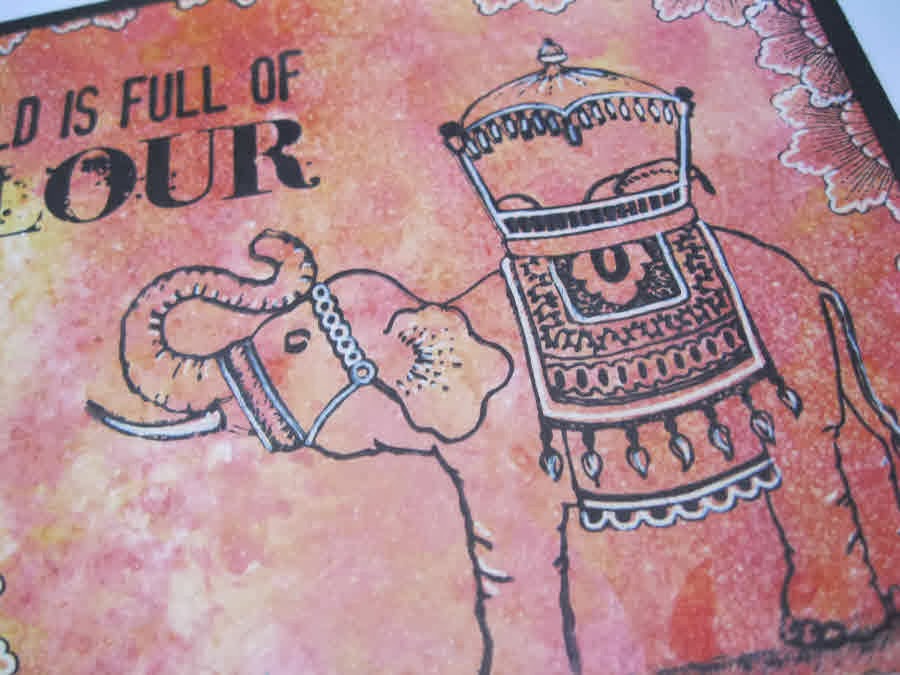
I'm loving this orange background phase! Again created with Alcohol inks onto glossy card - a mix of yellow, orange and cranberry and this time spritzed with Stazon stamp cleaner - it will give this lovely fine mottled effect.
The stamping is all by Chocolate Baroque stamps in Archival Black. The elephant and that most gorgeous flower are both from the same set - Indian Elephant. The wording is from Artistic Affirmations.
It's worth taking the time on this sort of project to put in lots of white detail - it's what really makes the project come alive.
One of my favourite pieces!
This is a scheduled post as I will be at the second day of the trade show today... my head by now will be spinning with inspiration! Keep an eye on our facebook page for lots of updates as I'm sure I'll be sharing inspiration about what I've seen as soon as I can!
happy crafting
Jane
www.aldridgecrafts.co.uk
Shop for Chocolate Baroque stamps
Saturday, February 15, 2014
Make Time to Make Art
I love the colours on this piece. The background has been created using Alcohol Inks onto glossy cardstock. I just love the vibrancy of alcohol ink backgrounds. I did the background quite a while ago so not 100% sure of the colours... but it looks to me like Orange, a bit of yellow, Cranberry and drops of blender.
As the background was so beautiful this one didn't need any other colours adding to it, so I kept it simple and stamped in Black Archival. The butterfly stamp is from Crafty Individuals and the other stamps are Chocolate Baroque. A few highlights with a white gel pen make all the difference!
A very important sentiment on this card.... make sure you make time to make art this weekend... You'll be so glad you did!
happy crafting
Jane
www.aldridgecrafts.co.uk
Alcohol inks are available to buy instore but sorry we can supply online due to royal mail dangerous goods restrictions!
Shop for Glossy Card
Shop for Chocolate Baroque Stamps
Shop for Crafty Individuals Stamps
Subscribe to:
Posts (Atom)