Aldridge Crafts & Champagne Moments
01953 454976 www.aldridgecrafts.co.uk
Craft Workshops
Held in Store – Limited places – book now! - workshops are all on our website where you can book & pay online.
Booking is essential. Payment is required at the time of booking.
Check online or in-store for pictures/samples of our workshop projects.
Wed 4th June 2 – 4pm Meltpot Marvels £20
The
Ranger Meltpot is a great tool. This workshops will show some of the
things that you can create using it. Faux dichroic glass, Galaxy flash
and UTEE combining to make a show stopping ring. There are so many
things we can try. So book your place and join in the fun! The
workshop price includes all the jewel enamel and use of tools (Beginners)
Thu 5th June 6-8pm Papier Mache Stamped Heart Panel £15
In
this workshop with Jane you will create a beautiful painted papier
mache heart panel. We will use rubber stamps, inks and
embellishments to create a unique piece of artwork perfect for your
home. (All levels)
Wed 11th June 2 – 4pm Gemstone and Crystal Collar £20
Using
Agate or jasper column beads and teardrops combined with Tibetan
silver bead caps and crystal rondelles. Skills required turning loops
with round nosed pliers. The price includes all beads and use of
tools. (Intermediate)
Wed 18th June 2-4pm Cascade Necklace and earrings set £20
This
lovely necklace combines chain links, gemstones and pearls in a
lovely cascade in summer tones ideal to team with your summer dress
with matching earrings. Price includes all beads, gemstones and use
of necessary tools. (Intermediate)
Saturday 21st June 10-4pm
FREE Stix2/Woodware Demonstration with Annette Taylor
Come
along to see Annette demonstrating using products from Stix2 and
Woodware. Pick up lots of handy hints and tips and see her using the
latest products. Just come along on the day! - FREE!
Wed 25th June 2 – 4pm Polymer Clay with Gill Thompson £20
Come
and learn how to work with Polymer clay each month Gill teaches a new
technique using this versatile medium. Price £20.00 includes all
clay, tuition and use of tools. (beginners)
Thursday 26th June 6-8pm Scrapbooking for Beginners £15
Scrapbooking
is creating your own personalised photo album to record your pictures
and memories. You can use a variety of decorative papers,
embellishments and die cuts to create a beautiful scrapbook page which
you can put together in a lovely album. All you need to do is bring
along a couple of photographs and we will help you create a scrapbook
page. All who attend the workshop will be entitled to a 10% discount
on any album in store on the day. (beginners)
Wednesday 2nd July 2 – 4pm Flower bracelets £15
These
very pretty bracelets combine 4mm crystal bicones with 6mm rounds to
make lovely floral bracelets suitable for young and old alike. Price
includes all beads, findings and use of tools. (beginners)
Thu 3rd July 6-8pm Pop Up Box Card £15
Learn
how to make a pop up box card which you can decorate with flowers.
This clever card folds flat to fit into an envelope. We will use a
mixture of decorative papers and lots of flower dies to create a
unique card. (Any level)
Saturday 5th July – 10am-12 FREE Demonstration in store with Jane – Stampbord – learn
how to stamp onto this clay board to create vibrant embellishments
which can be used on your crafting projects or as jewellery- FREE!
Wed 9th July 2 – 4pm Chain Maille with Shawn Mills £20
Would
you like to learn a new skill or have tried chain maille and would
like to learn another weave? Our guest tutor Shawn has several years
of teaching Chain Maille. Price includes all rings, findings and
use of tools. (Beginners/intermediate)
Thu 10th July 6-8pm Sheena’s Faux Leather Technique £15
You
have probably seen Sheena Douglas’ fabulous technique on social media
forums or on the telly, well we will show you how to turn a piece of
ordinary Kraft card into a pliable leather looking material!
Perfect to use in your mixed media projects, as a bookmark or book
cover or as part of your scrapbook. (Any level)
Saturday 12th July 10am-12 FREE demonstration in store with Jane – Using Ink with your Embossing Folders.
Learn about the different effects you can get by using inks with your
embossing folders through your die cutting machine. - FREE!
Wed 16th July 2 – 4pm Gemstone Torque necklace £20
A
lovely wirework piece using 1.5mm wire as a base as your torque then
add gemstones to the frame using the tiara technique. Makes a lovely
light-weight but visually beautiful necklace. Because of the nature of
the tiara technique used good manual dexterity is needed. Price
includes all gemstones, wire and use of tools. (Intermediate )
Sunday 20th July A WHOLE DAY OF WORKSHOPS
10-12.15 Sweet Poppy Stencils with Paste and Flitterglu and Flakes £15
We
will spend the morning using stencils together with dimensional paste
but also how to apply flitterglu and flakes through a stencilled
design too
12.45-3pm An introduction to Alcohol inks £15
We will spend the afternoon learning how to use alcohol inks to create backgrounds and then stamp onto them.
You can book on these workshops independently, but if you book for both you get a free bottle of Alcohol Ink. (Any level)
Wed 23rd July 2 – 4pm Polymer Clay with Gill Thompson £20
Come
and learn how to work with Polymer clay each month Gill teaches a new
technique using this versatile medium. Price includes all clay,
tuition and use of tools. (Beginners)
Thurs 24th July 6-8pm Steampunk or Flowery Birdhouse £15
Decorate
a papier mache birdhouse with paint and die cuts to create a unique
piece of art you can put in your home. You can choose between a
grungy steampunk style, or a soft flowery style. (Any level)
Sat 26th July 10-12 FREE demonstration in store with Jane – Using Sakura Pens – stardust, glaze etc. Learn all about this fabulous pen range and the ways you can use them. - FREE!
Thurs 31st July 6-8pm Zentangling £12.50
Come
and learn the art of zentangling – posh doodling! You will learn
how to break down and create intricate looking patterns which you can
use with stamps, die cuts, stencils and on scrapbooking pages. (All levels)
Can’t make one of our workshop dates? Most of our workshops can be run on a 1-2-1 basis at a mutally convenient time. Minimum cost for a 1-2-1 workshop is £20.00 for a 2 hour workshop. Phone/call in to book 01953 454976
By booking you agree to our booking/cancellation T&Cs available to see online & instore.
Monthly
Craft Club – Join our friendly club that meets monthly to get together
with other crafters for crafting, tea and a chat – Friday 20th June,
18th July 15th August 6.15-8.30 at the francis Rooms in Connaught Hall -
£3.50 on the night.
Monday, May 26, 2014
have you found my new blog yet?
Did you know that my blog has moved? It's now attached to my website. You can find it at
www.aldridgecrafts.co.uk/blog
here are just a few of the posts I've put up since moving... be sure to come and find me so you don't miss out on all my new creations!


 see you there
Jane xx
www.aldridgecrafts.co.uk
www.aldridgecrafts.co.uk/blog
here are just a few of the posts I've put up since moving... be sure to come and find me so you don't miss out on all my new creations!
Jane xx
www.aldridgecrafts.co.uk
Tuesday, May 20, 2014
Monday, May 19, 2014
My Blog is moving! #147


That's enough of the boring techy stuff - onto the creative stuff! Today's creation is zentangling with the Sweet Poppy Phoenix Stencil. Love this stencil for zentangling! I kept the body pattern quite bold so it really stood out and then used repeats of quite simple patterns for the feathers and tail.
Did you know that we stock Zentangling supplies? I've just had a new delivery of the fabulous books - only £5 each and 11 different titles to choose from. We also stock the Micron pens too - but these haven't been put onto our website yet - but just drop us a line to add them to your order.
That's all from me today... off to get a good night's rest as I have to have my technical head on in the morning!... wish me luck! :-)
happy crafting
Jane
www.aldridgecrafts.co.uk
Sunday, May 18, 2014
Number 83 #146


Well... this is the start and the finish pics - at last I am again organised and have room to craft hurrah!

I've started with an alcohol ink background - dragging the colour down in vertical stripes. The stamps are all Crafty Individuals - all stamped in Archival Black. Then a few white highlights to finish. A nice little piece of artwork I think!
Must get out the alcohol inks.. it's been a while since I've used them. Did you know that there are new colours out? We've just had a delivery in store of the new shades.
now off to create a little zentangling ready for the workshop I am running in the morning!
hope you've had some time to enjoy the sunshine today
happy crafting
Jane
www.aldridgecrafts.co.uk
Saturday, May 17, 2014
Indigoblu... more words! #145


I started by stamping the Indigoblu Tree-mendous stamp around the borders in my latest acquisition - Archival Potting Soil. I then stamped my greeting from the BFF set in black. I drew a border around the greeting and added some dashes in black and white pen. I finally traced all the outlines of the leaves with a gold gel pen to add a little extra detail.
It was such a difficult choice in the end as to which one to enter into the blog challenge - I couldn't decide so my hubby got the final vote and preferred the colours of yesterday's piece.
So which is your favourite out of the two? Today's project or yesterday's one?
happy crafting
Jane
www.aldridgecrafts.co.uk
Friday, May 16, 2014
Indigoblu Words Challenge #144
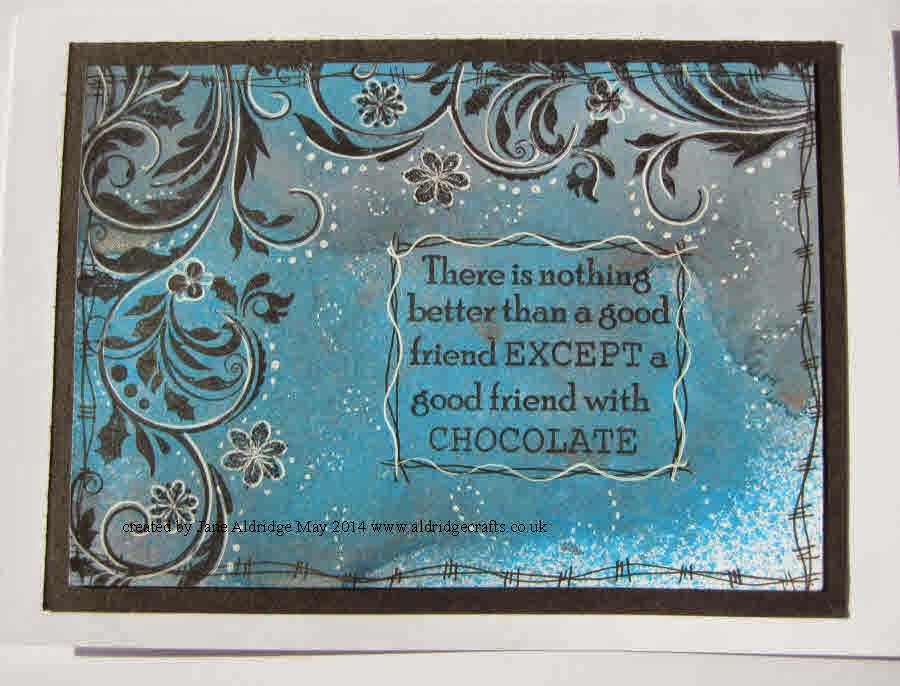


I started by spritzing my background with a mix of blue shade Cosmic Shimmer Mica Sprays. Once dry I stamped my words (Indigoblu BFF set).
I then started to add my border detail - I've used a Christmas stamp - (Indigoblu Baubles Flourish). I love this stamp because it's perfect for Christmas - but the rest of the year, just stamp the flourish part and turn the snowflakes into flowers!
I then added plenty of white and black pen highlights - including some little white dot swirls in the background. It's been mounted onto a simple black mount onto a 5x7" card.
I am entering this for the Indigoblu Challenge Blog Words are all you need Challenge
happy crafting
Jane
www.aldridgecrafts.co.uk
PS - don't forget it's craft club in Attleborough tonight - join us for a free Scrapbooking for beginners make & take!
Thursday, May 15, 2014
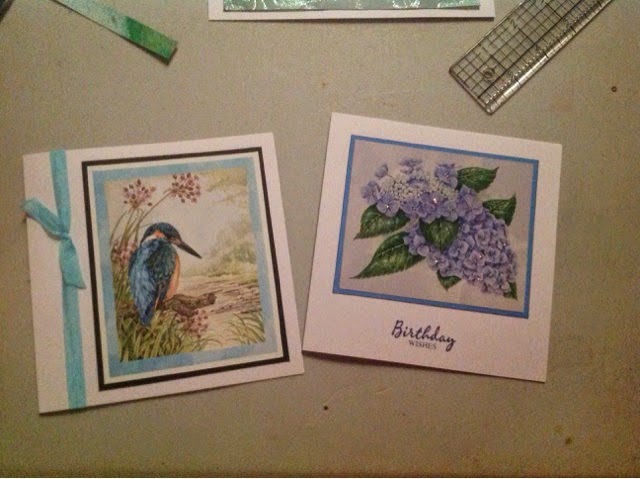
Kingfisher #143
I have had a lovely evening running a workshop for a local WI group creating pretty bag charms. It is always so nice to introduce new people to beading, they were all really pleased with their creations and we all had a lot of fun!
Today's projects are very quick and easy ones. I have been exploring my CD roms as it has been such a long time since i have made any cards with them. I wanted to rustle up a few quick and easy cards for the shop, and these always make such lovely cards without needing a lot of embellishments. Do excuse the poor photo today, i have left my camera at the shop so had to rely on my ipad taking photos under poor light. . Happy crafting
Jane
Www.aldridgecrafts.co.uk
Wednesday, May 14, 2014
Blue and White Cat #142

Finn has such gorgeous blue eyes, going with a blue and white theme picked out the colour in the photo perfectly. I wanted a background paper that had something going on - but not too much that it would distract from the main focal point. The flower paper again - enough pattern without being overpowering. I mounted both the photo and the flower paper in the same card which is a brown/green/gold shimmer cardstock.
I next cut out some dies out of white cardstock - all Memory Box, I used Blooming Vine, Bella Bouquet, Chesapeake Circle. I cut a couple of each die so I could play around with layout. Once happy with how they sat I delicately lifted the card stock to dab a little glue so they would stick in the place I had positioned them. Once dry, I then turned over and added more glue and stuck down my central panel. A few little blue gemstones in the centre of the flowers added an extra detail.


happy crafting
Jane
www.aldridgecrafts.co.uk
Tuesday, May 13, 2014
Lazy Cat Nap #141
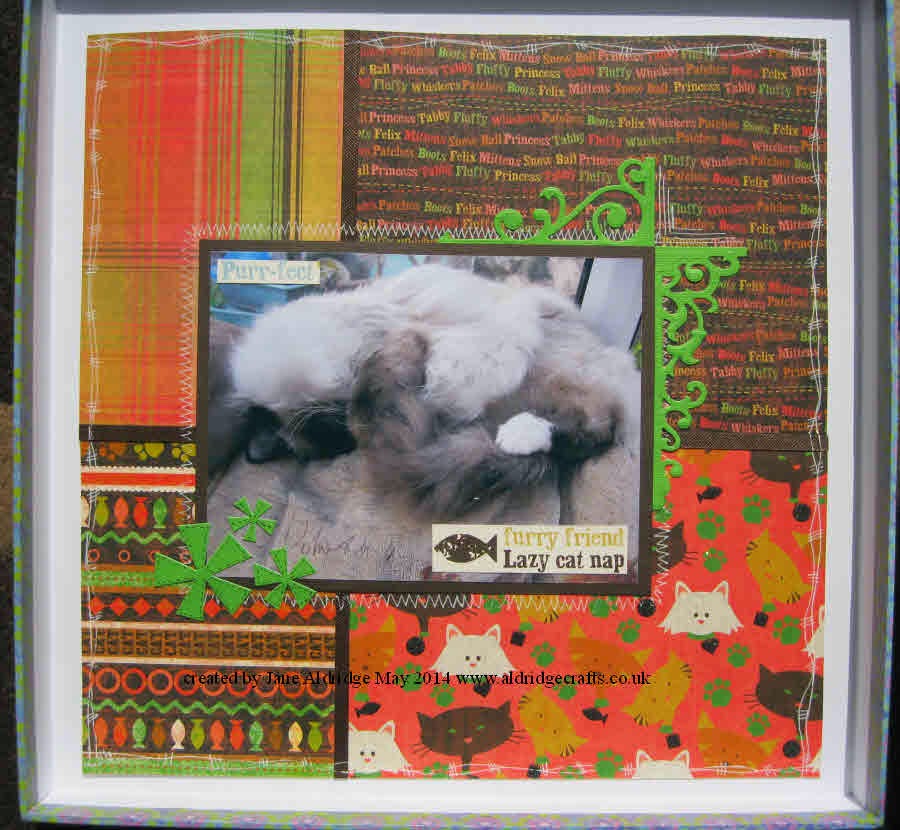
I wanted this to be a bold bright page so the pale picture really would stand out. I used the DCWV Pets 8x8" stack. I started by taking out of the pad each of the cat pages - if you are anything like me - when you get one of these lovely card and paper stacks, they are a so lovely you don't want to use the papers!... so I always take them out of the book so no excuse then!
I wanted to use a variety of page designs and so I decided to split my page into four, but not so it was exactly central - ofsetting my squares gives a little more interest.
I mounted my picture on brown card an then cut a couple of thin strips to use as my divides between the pages.


happy crafting
Jane
www.aldridgecrafts.co.uk
Monday, May 12, 2014
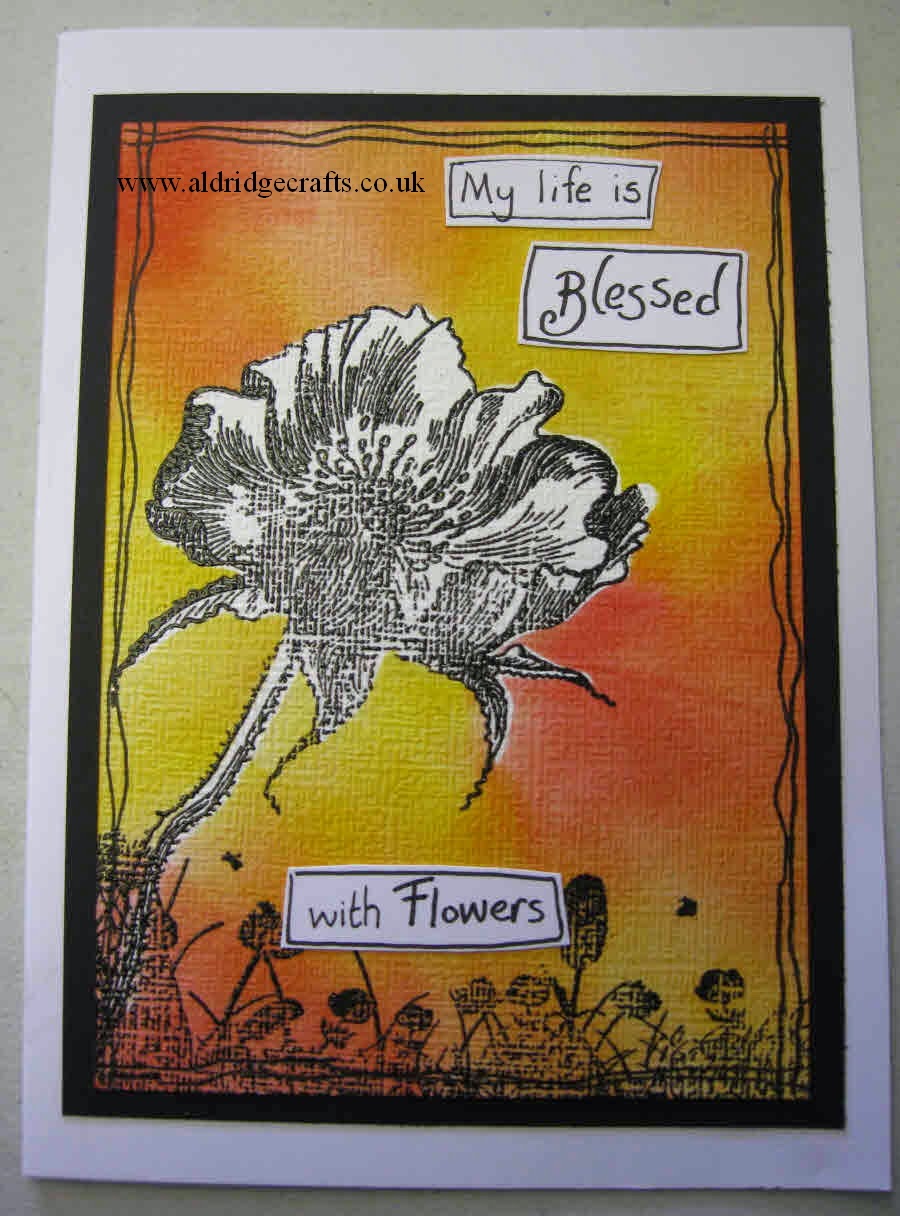
Hot Pinks and Orange #140


I created this piece using the Chocolate Baroque Wild Meadow stamp set - a firm favourite of mine. The greeting is from the Chocolate Baroque Artistic Affirmations set. I've used a clock mask in teh background and stamped in dark shades of archival and Versafine inks to give that silhouette effect. A final bit of white and black highlights adds the finishing touches!
happy crafting
Jane
www.aldridgecrafts.co.uk
Sunday, May 11, 2014
Stamping Workshop #139


These are the fabulous creations of Laura and Lisa who joined me at today's workshop..
Aren't they fab!
 |
| Lisa's Steampunk card (Creative Expressions Stamp) |
 |
| Lisa's Daisy Card (Stampendous Jumbo Daisy Stamp) |
 |
| Laura's Lighthouse card (Crafty Individuals stamp) |
 |
| Laura's Peacock card (Chocolate Baroque Stamp) coloured with Cosmic Shimmer Watercolour Paints |
hope you got to have a crafty day too
Jane
www.aldridgecrafts.co.uk
Saturday, May 10, 2014
Owls #138


All I had to do was decorate it! I've had this Magenta owl stamp for a while and been itching to use it - and this was the perfect project. The background was just so pretty I didn't want to go too elaborate with the decoration.
He was stamped and embossed with detail black powder and then coloured using a Distress Marker with a few white highlights.
The dash border was added with a black pen and then the final detail was to tie some baker's twine around the top and tie on a little owl charm.
Did you know that we stock 100s of design of charms in our shop - they are perfect to accent your crafting projects!
Entering the following challenge: Crafts Galore Challenge: Anything Goes
happy crafting
Jane
www.aldridgecrafts.co.uk
Friday, May 9, 2014
Rainbow Poppies #137


I next stamped using archival black and stamped my greeting (Indigoblu) and my poppies (also Indigoblu).
I used my clear stamp block to draw a border around the words and added black shading one side and white the other to make it look three dimensional (also to make it look like I stamped it on an angle on purpose!! - oops).
I coloured my poppies with Distress Markers - I was really impressed how much colour showed up as the background was so bright (now I need more distress markers to add to my four colours!!).
I added a few highlights and lowlights using black and white pens on the poppies and decided to also outline the flowers in white gel pen to make them stand out of the background just that little bit more.
A final addition was to add the dash border and then stamp a few swirls in toffee Versafine at the bottom to give it a base border.
happy crafting
Jane
www.aldridgecrafts.co.uk
Thursday, May 8, 2014
All Purple and Yellow #136


I painted some of the butternut paint onto separate card and once dry stamped the greeting using purple archival ink and the stamp is from Indigoblu. I ripped the edge to give a wide border and then just caught the border with my purple ink.
I cut out my two dies - both from Crafty Individuals and tinted them using cut n dry foam with my purple archival.
Once the die cuts were stuck down I then added little # accents and a border with my black fineliner pen.
happy crafting
Jane
www.aldridgecrafts.co.uk
Wednesday, May 7, 2014
Think Happy Thoughts #135


I drew a couple of borders with my fineliner and then as a final touch added Glossy Accents over the main image.
I've had a lovely crafting session this morning and you'll be seeing the projects created over the next few days - I've been busy playing with inks & paints again!
happy crafting
Jane
www.aldridgecrafts.co.uk
Tuesday, May 6, 2014
Everywhere Tranquil #134


The background was created with cat's eye pigment inks direct to cardstock and then stamped using the crackle stamp from Crafty Individuals. All the other stamps are also Crafty Individuals - the ladies, butterflies and the words are on different stamps.
My usual few white gel pen highlights add some extra detail.
short and sweet tonight! :-)
happy crafting
Jane
www.aldridgecrafts.co.uk
Monday, May 5, 2014
Scottish Wedding #133

I was asked to make a wedding card for a friend for a Scottish Wedding card. I thought the thistle from the Chocolate Baroque Wild Meadow stamp set would be perfect.
I started by stamping the two thistles and coloured them with coloured pencils. I then mounted onto a pretty lilac card and the black mount.
The paper and the greeting are both from Lily of the Valley and the final accent of the lilac gingham ribbon I think finishes the design nicely.
It's nice to look back over past creations, gives you some new ideas of old favourites you can revisit and revitalise with your new techniques
happy crafting
Jane
www.aldridgecrafts.co.uk
Sunday, May 4, 2014
Baked Clay Pendant #132

I started with a flat base and cut out my heart - I've worked in a dark brown clay, but its only on the back that you can see the colour so you can use whatever colour you have to hand - either Fimo or Sculpey type clay. I used a little metal flower to add some texture to the background, just by gentling pressing it into the clay.
I then rolled out the clay into long thin sausages and shaped it around the outside and then shaped for the flower stalk.
The flower is made of five little round balls of clay, flattened and shaped with my embossing tool and then another ball for the centre.
I then applied mica powders - gold, purple and pink to highlight the design. I put in a hole at the top so I could attach my pendant.
then bake and all ready!
happy crafting
Jane
www.aldridgecrafts.co.uk
Subscribe to:
Posts (Atom)