Monday, December 6, 2010

Birdhouse Card


Another idea for the birdhouse stamps - you don't just need to make birdhouses - you can also use the front section to create a fab card too! Just trim the roof pieces down and if you create a flap you can use this to stick behind the birdhouse front. I've also accented this with the gorgeous cosmic shimmer ribbon too!

happy crafting

Jane

Sunday, December 5, 2010

Busy Times!


Well it's been a busy weekend with the Oriental workshop on Saturday and a craft fair today and still Diss club night tomorrow to go!

Today I thought I would share the picture of the jewellery set I made with a mix of seed beads, crystal rondell beads and glass pearls - all in shades of blue. These jewellery sets are easy to make and are fabulous Christmas presents too! There are lots of beads to choose from on the website and I'm working on putting the latest delivery of beads online too!.. so more to come!

happy crafting

Jane

Friday, December 3, 2010

Birdhouses


Finally... I've found the time to put up the pictures of the birdhouses!. Those of you who visited me at Bury St Edmunds saw me demonstrating with these. They are created using the birdhouse stamps from UMount and make lovely tree decorations. You can also convert them to a gift box and I thought they would also make lovely place names for the Christmas table - the roof space is ideal for putting your guests names onto! Finally why not go non christmas with the Eco-green acrylic paints. Simply stamp the design onto card, cut and score all your pieces then decorate the other side - you are then free to create any design you wish!
There are two designs available - poinsettia and holly

Friday, October 15, 2010

Nestie Snowflakes

Had a lovely crafting session today with my friend. Neither of us were awake enough to be particularly creative - but still managed to have a few creative sparks! I created this card using a die from a set of snowflake nestabilities and also a circle nestability. It's all done with mirri card - and the picture doesn't do it justice! Just goes to prove it is always worth experimenting with your dies!

happy crafting
Jane
PS - I haven't forgotten about putting up the samples - they'll be appearing soon!

Friday, October 8, 2010

more pics!


be back later with pics of my samples!
Jane

Workshop Creations!


OMG - where did this week go... can't believe its Friday already - I'm so behind this week! I've got loads of pics to put up on here.. Had a delivery including stuff from Papermania and finally some of the Tim Holtz folders & dies & more.... and it's still sitting in the box awaiting my attention!.... Got another delivery due today with Stampsaway stamps and some fab new masks... I'll get them up as quick as I can... promise!! :-)

Well last week's workshop was fab! A room full of 14 excited crafters.. and a lunch with a fabulous chocolate cake (thanks Maggie!)... what more can you want in a day! Some of the ladies were kind enough to let me take pictures of their creations to share with you all...

These are of the never-ending card project. I'll put my samples up for you later too!

more pics to follow....

Jane

Monday, October 4, 2010

and the winner is.....

.... our poll was a dead heat so I'll rustle up a project using UMount stamps and Nestabilities to post up later this week!.... watch this space for the pictures of the fab projects from Saturday's Workshop. I'll try to get them up in the next couple of days for you all to see!
Happy crafting
Jane

Friday, October 1, 2010

World Cardmaking Day - 2nd October

Did you know it's world cardmaking day tomorrow? If you make a card on Saturday, scan it in or take a photo and send it through by email. If I get more than 20 then I'll put the best five up on my blog and a prize for the winner! Email your cards to janealdridgecards@gmail.com. I look forward to seeing all your creations!
I'll be off having a crafty day myself so it couldn't be a better way to spend world cardmaking day!
Jane

ooooh more goodies hurrah!

We've just had a delivery here from Creative Expressions - so watch the web for some new stamp plates including the lovely Winter Wonderland!....and the Tim Holtz Rulers are now back in stock. We're still awaiting our order for some new versatile masks that can also be used as embossing folders - should be anytime soon too.
We've just ordered (to arrive next week) a selection of Tim Holtz dies and embossing folders as well as a selection of goodies from papermania too!... so lots of goodies in the pipeline!.

I'm busy preparing today for our all day workshop tomorrow - three fab projects and I'll put some pictures up of the samples onto the blog next week so you can all see them! should be a great day!
Jane

Saturday, September 25, 2010

Little Boy Blue!


It's nice sometimes to play around with different layouts. I wanted to create a bright and funky card for a boy, and this seemed to fit the bill! It's great how just putting your backing at an angle just gives a different look - always worth experimenting! The stamp is from Woodware and has been coloured in with ProMarkers and then cut out with layers using the Nestabilities.
I've had a good day today making up samples for next week's workshop and playing with the new Crafts Too Folders and some of the dies from Nellie Snellen & Marianne designs too! I'll be putting up pics after the workshop so you can all see the samples.
I'm off for ideas and inspiration to Ally Pally tomorrow - be good to watch all the demos!

happy crafting

Jane x

Friday, September 24, 2010

Come and vote in our poll on facebook!

We'd like to know your favourite product and the winner will be used in the next step-by-step project! Poll closes on 1st October. Choose between Martha Stewart Punches, Nestabilities, Indian Glass Beads, Umount or Crafts Too embossing folders. Click here to vote!
Jane

Tuesday, September 21, 2010

Let's get embossing!


oooh the excitement of a new delivery. I have a big box ready to be unpacked. This one is from Crafts Too and has their new embossing folders in it - as well as restocks of the popular Noel and Baubles folders (amongst others) - that flew out at Thetford! I'll be busy getting them up onto the web in the next few days - bear with me!.... but just had to share a sneaky peak of some of the new designs! There's also new dies from Joy Crafts and Marianne Designs and more of those gorgeous glass pendants too!


happy crafting


Jane

Sunday, September 19, 2010

No more scraps!

One of my favourite cards to make is using bold prints from the Dovecraft Wild Blossom pack of papers and just adding a few accents with glitter and ribbon. Whenever I do a card sale - these cards always fly out! But cutting a 5 or 6 inch square out of an 8 inch sheet of paper leaves me with lots of offcuts that seemed a shame to throw away. So I had a play today and found the perfect way to create some gorgeous cards using my lovely scraps of paper. I've kept it simple as usual, just three strips of card and accented with glitter. I did play around with the idea of adding some flowers or ribbon - but it didn't seem to add anything to them - so I left them as they were!... hope it inspires you to get raiding your scraps supplies!!
happy crafting

Jane x

Friday, September 17, 2010

one border, two cards!


Two cards for you tonight - as I won't have time to blog tomorrow! Following on from yesterday's card I have used the other die from the same border set on these two cards. This lovely lattice border has been used on a 5" square card. The border is slightly smaller thatn the length of the card so gives a nice finish top and bottom. I've then just lined the right hand edge of the inside of the back piece of card with a contrasting colour to make the most of the delicate pattern. The first image of the lady is from the fabulous Joanna Sheen Fashion Boutique CD - an all time favourite of mine. The dog is a stamp from Wild Rose Design and has been coloured using ProMarkers and cut out using a nestability die. Simple designs but so elegant and very effective. If any of you are creating lovely things using your nestabilities and border dies, I'd love to see them - email me an image and I'll put the best ones up on a future blog!
here's hoping you all find time to craft this weekend!
Jane

Thursday, September 16, 2010

Something Fishy.....


A combination of techniques on this card. Firstly I've created the fish image using a Dreamweaver stencil and Gold embossing Paste - a really easy and effective technique that I highly recommend you trying!. I've used my nestabilities to cut out the oval and the scalloped oval surround. I've then had a play with my border nestability - part of the pendants range - and cut out the border in black and then gold mirri and pieced the cut out gold pieces into the black piece. I just put double sided tape on the reverse of the black piece so my gold pieces stayed in place.

happy crafting!

Jane

Wednesday, September 15, 2010

Pretty in Pink


Here's the first of my creations. It's not the best picture in the world I'm afraid, but hopefully you can see the detail. I've cut 4 squares from white card and embossed 2 with a dot folder and 2 with a flowery folder. Then mounted the four squares onto Black card then onto a large square card. Then I've used my nestabilities to cut the two mounts and my stamped girl (a Woodware stamp) that has been coloured with ProMarkers. Then mounted it on top of the squares. I like the bold contrast of the pink black and white on this card.


happy crafting


Jane

I'm Back!

I know... it's been ages!.... it's been a busy time for me - but unfortunately not much time for crafting!... but I've had the bliss of having a couple of days this week to play... and not for any particular reason - no samples to make - just able to play!.... so I promise, watch this space for lots of new card samples and jewellery ideas to appear soon... I'll have lots to show you to make up for being such a bad blogger... promise! Jane

Sunday, June 13, 2010

Decisions decisions.....

You all know what it's like.. you are at a show and have a set amount left to spend... and just what do you go for... you want everything... but have to make a decision - it's always so tough!... Well I have had the same dilemma this weekend over what stock to order! As ever I have my shortlist of what to next order.. and after several different contenders I've decided and ordered more Martha Stewart punches. I was blown away by the reaction I got from my customers when these first arrived this week - and having tried them out I can see why!

I've also finally got my beading order in.. so expect lots of lovely charms and beads and chains and watch faces.. oh lots of lovely things on their way.

It'll be a busy week sorting out all my new stock and getting ready for Needham Market next Sunday - always a fun event - if exhausting!... so you'll soon get to see some new projects on the blog where I'm preparing my demo and also for the workshop in July!
happy crafting
Jane

Thursday, June 10, 2010

Clarity Stamps & Martha Stewart Punches


Yippee - the deliveries have arrived - so more Clarity stamps and new Martha Stewart punches have arrived... they are already selling very quickly so providing I have some left they'll be up on the website this weekend!

Tuesday, June 8, 2010

Stamping Workshop - 3rd July

Come join us at our workshop! It's on Saturday 3rd July 10-4pm in Harleston.

We will be doing 4 projects teaching you 4 different stamping styles and techniques.

Project 1 will be grungeboard bracelets (or if we can't get stock of grungeboard then Clarity stamp corners)
Project 2 will be stamping & colouring with Promarkers
Project 3 is Using Distress Inks
Project 4 is Big n Juicy ink pads with Brayers. This last project will be a duel project - a simple technique for beginners and some more advanced techniques for those a little more confident with their crafting.

More information on the website and you can also book and pay online.

Workshop charge is £15.

Come and have fun!

Jane

Saturday, June 5, 2010

Golfer card

It's not long until father's day (20th June) so time to get planning on a card to make for your dad/grandad or perhaps for your other half for your children to give. A quick an easy card is this one with the golfer. We have used a fabric square panel. Simply take some scrap card (cereal packets come in handy!) and cut a square to the same size as your picture panel. Add some glue - pva/gluestick or even double sided tape and stick your panel onto the card. Turn it over and cut off a triangle off each corner to make room to then fold each edge over and stick to the reverse of the card. You can always add a little bling to your panel with some glitter applied over a quickie glue pen. Next cut a larger square of a matching paper and stick at an angle on a 6" square card. Then place your square panel on top. Sticking them at an angle hides any wibbly edges I've found as it can be tricky to get your panel mounted perfectly symetrically. As a final touch - my favourite one of 3 peel-off dots on each corner and voila!... a quick & easy card made. These fabric panels come in lots of different designs - so if golf isn't his thing.. you may find something else - and with 6 square panels for just £2 they won't break the bank either! Click here to see our selection of fabric
Happy crafting
Jane

Monday, May 31, 2010

More from Create a Scene Cottage

More from the Create a scene cottage set of stamps. This time we've used a selection of stamps to create a scene - start with the greenhouse in the middle. Then stamp the flower pots in the foreground. then the wheelbarrow on the left and fill in with the flowers. I've coloured with the promarkers. I only have a couple of greens, so use a yellow to add highlights to your green areas. A good colour for your green house is a pale blue - like pastel blue - just a few dashes here and there in the panes of glass is enough to give it some life and depth. More from this set of stamps later this week! Happy crafting
Jane

Friday, May 28, 2010

A new name.. how exciting!

Well finally it's done. It's been talked about long enough and I've finally got into action and changed the company name! Jane Aldridge Handmade Cards originated when I started doing wedding stationery and handmade cards. Over the years my business has changed to card crafting supplies and now diversifying out further to include other crafts such as scrapbooking, jewellery and I'm sure more new trends will come along that I'll want to include too!... so the old name just didn't seem right any more... so from here onwards we are known as...

Aldridge Crafts

We've a new web URL of www.aldridgecrafts.co.uk and a new email aldridgecrafts@googlemail.com, but don't worry - we see no need to get rid of our old links that many of you have bookmarked - so there's no hurry to change your links. Our old email address will remain active too.

And best of all - we are celebrating with a sale - 10% off everything for the Bank Holiday weekend! With some new stock to tempt you to! Wild Rose Studio stamps, CDs and papers, Marianne Design creatables gorgeous die cutting stencils and new embossing folders from Crafts Too!
enjoy your weekend!
Jane

Tuesday, May 25, 2010

Distressed Cottage

Here is the second Cottage card as promised.

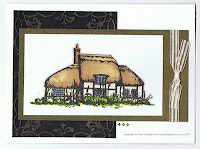
This time I've kept it ever so simple. Stamp your cottage with Distress Ink Black Soot. Then take a waterbrush or a paintbrush and a little water and drag your colour. Try to make it quite rough on the roof in the line of the angle of the roof as it adds to the effect of the thatch. Then just look at where you have shadows to make those areas a little darker but basically if you just drag a little colour here and there, you'll still have a fab result - you don't need to be an artist! Try to keep your touch quite light - you'll have a much better finished picture if you have light areas and dark areas. Try this technique with all different colours of distress ink - brown works really well - but any colour will look effective and sometimes it can make for a different style card if you use something unusual like red or purple. Whatever colour you choose - you can keep your background simple so that it accents the simplicity of the stamped design - so either stick with a neutral colour like black, perhaps a gold or silver depending on your colour scheme or if you've used a colour ink, match it in. Don't forget if you haven't got a coloured cardstock to match your ink colour - just cut your mount to the correct size and then use your ink pad either with cut & dry foam or just directly with your inkpad to paper for darker colours. You only need to ink around the outside as you'll be covering up the middle!
Here are a few handy links if you want to get started with getting some of these supplies...
Click here for Distress Inks
Click here for Create-a-scene stamps
Click here for Cut & Dry Foam
Click here for Waterbrushes
Happy Crafting!
Jane

Saturday, May 22, 2010

Country Cottage

I've been playing with my Create-a-scene Cottage Stamps. This lovely cottage is such a lovely stamp. For this card I stamped my cottage in Memento Tuxedo Black, then coloured it using my Promarkers. It's quite a large stamp so it's best made into an A5 card. I mounted the cottage onto a card that is shimmery gold/brown and cut it slightly longer than my cottage so I could tie a piece of cream ribbon around the end piece. It needed something behind it so I cut a piece of black card, ran it through the cuttlebug with an embossing folder and highlighted the design with a Brilliance Galaxy Gold ink pad. A final touch of a few peel-off dots just for a little detail was all it then needed! I'll post another one later this week - same stamp - but a different style of card.
Off to Wymondham tomorrow for a craft fair... it was nice to have an excuse to make up some cards today!
happy crafting
Jane

Sunday, May 9, 2010

it's been a while....


I know.. I've been a bad blogger.... I've been laid low with a nasty bug and just haven't had time to blog... so I'm going to try and catch up! Had a fab day with the Attleborough crafting group yesterday doing projects with them - and I got to craft on their fab projects too!.. A lovely group of ladies and we had quite a giggle!
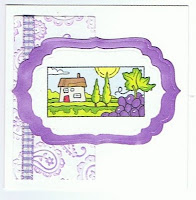
Today's card has been made using the Woodware Wine Buff set. This is a nice set to create a card for men - so would be ideal for Father's day cards. However, after making a few masculine cards with these stamps - I thought I would do one with a more feminine feel as I'm sure there are one or two ladies out their who appreciate a good bottle of wine!! :-) So for this one I stamped and coloured the image in with Promarkers and then used my nestabilities to create this lovely frame. I thought a lilac theme would be nice - so I embossed my panel with the paisley embossing folder and then added a little inky highlight to the raised sections. Finally a piece of gingham ribbon just added the finishing touch!
Did you know you can buy 2m of ribbon for just 50p from the website? We've lots already listed on there - but have some new colours in stock that we'll be putting up soon too! Ideal for that little extra something on your card!
It's a busy week this week - Diss club on Monday then Harleston club on Wednesday... better get making some ATCs to swap!
happy crafting
Jane

Sunday, May 2, 2010

Bank Holiday Sale - Joanna Sheen Stamps

Just a quick one to let you know we are having a Bank Holiday Sale. Get your Messy Rabbit and Lofty the Giraffe stamps at just £4.50 each this weekend. Savings on other Joanna Sheen stamps too.
Happy Crafting
Jane

Thursday, April 29, 2010

Lots of bling!


I'm relatively new to jewellery making - but already hooked! I've been making up a few new designs this afternoon - partly as I'm keen to learn new techniques and try out different designs so I can share with everyone - but also as I'm doing the Tasburgh festival on Saturday - I thought it may be nice to have to some jewellery to sell too! So here are a few of my favourites that I've made so far...
always nice to learn something new!
happy crafting
Jane

Tasburgh Festival this Saturday

Hi all - sorry it's been a while - I've been laid low with a nasty bug, cough cough. Just a quick one to let my local followers know that I'll be at the Tasburgh Festival (off the A140) on Saturday (1st May). It'll be a great day - its open 11 til late and has lots of events planned throughout the day. If you are on facebook just search for their page for lots more info! I'll have a small selection of (weatherproof!) craft supplies for sale on the day alongside some cards & jewellery for a change! so come along and say hello! I'll be back card blogging soon... I know I still haven't told you all about my workshop with Sheena!!.... Jane x

Saturday, April 17, 2010

Gone Fishin'


My Uncle turned the grand age of 84 on Monday. So the challenge was to make a card for him. He loves his fishing - so I thought it was an ideal opportunity to create a card using my brayer and my Big n Juicy inkpad. I already had a silhouette stamp of a fisherman so I set about using my brayer to create the water by first running it over some scrumpled paper. Next I inked up the fisherman and ran the brayer over the image then transferred it onto the waterline. Then I inked up the stamp again and stamped it so it lined up with the reflected image. Next I ripped some paper into a hill shape and masked off the waterline and then ran the brayer over the hill then flipped it upside down and inked a lighter reflection. I repeated the action on the left side of the picture. Then I inked up the brayer again and applied the colour to the corner. Finally I stamped the tree details on both side. Considering I've not done much brayering - and I only have the small inkssentials brayer - which isn't the ideal one to use for this technique - I was very pleased with my finished results! I used the Waterfall Big N Juicy and the trees were created using the clarity stamp naked tree and leaves set.
happy crafting
Jane

Wednesday, April 14, 2010

The Aliens have landed!


This fun card has been created using the UMount Outer Space (item 6472) stamp set. I started with a square of black card and spritzed it with Cosmic Shimmer Misters - Blue Lime, Bronze Blush and Lilac Night. Then I ripped some scrap paper into a hill shape and placed in down onto the card like a mask and sprayed it heavily with Ocean Sunlight to create the land at the bottom. I punched out a circle in white and spritzed it with lilac night and silver misters. Next I stamped my aliens onto black card. I created a mask for the green alien using a sticky note so I could have a row of three! I coloured in using Promarkers - tea green for the 'ghost' alien. Orange and true blue for the tall one and lime green for the 3 eyed aliens!. Then just assemble it all together for a fab fun card! I've a busy week this week with 3 craft events to do - but I've lots of cards to post up as well as the creations from the fab workshop I attended on Monday with Creative Expressions - so watch this space, I'll pop on later in the week to post up some more!
Happy Crafting
Jane

Monday, April 5, 2010

Those lovely ladies...


I haven't had time to make up any cards over the weekend - and thought I would have a browse through some creations I made a while back - sometimes it reminds you of stamps, designs, layouts or colours that you haven't used for a while and renews the inspiration. This is the card that leapt out to me. Created using a couple of images from the Joanna Sheen Fashion Boutique CD. I have spritz the background with a glimmer mist, mounted the two images, add a few holographic peel-off dot details and a simple polka dot ribbon... simple and elegant! I definitely need to make up some new designs with this CD... there's lots of favourite designs I use over an over again, but there's also often a gem of a picture you just didn't spot last time you looked!
Happy Crafting!
Jane

Thursday, April 1, 2010

Can you hear the Easter Bunny?


Sorry I haven't blogged for a couple of days.... been a busy week! Spent ages drafting out my newsletter for it not to save properly and had to do half of it again grrr - If you didn't receive it yesterday and would like to be added to the mailing list - just drop me an email - my address is on the right hand side of the blog and I'll add you on!.. you get to hear about new stock and special offers - and don't worry you won't get bombarded with mail like you do with some mailshots - 2-3 times a month at most!... anyway.. back to the topic in hand - Easter.... Just a quick simple card this time using the gorgeous bunny from the latest Joanna Sheen CD - Jayne Netley Mayhew Part 2 - I love this CD - it has lots of lovely animal and plant images to choose from - I could make endless cards from this CD alone! I hope you are all ready with your chocolate eggs... mine has been sitting on the shelf tempting me for a fortnight - but I've been good - it's still intact! I'll be spending time with my family over Easter - catching up with my brother which will be nice!
Poor Molly has been poorly today and had to go back to the vets - but she's feeling much better now and is barking at the top of her voice as I type - probably at some poor cat who has ventured into the garden as usual - so she's definitely feeling better!
I've been busy making some jewellery this week and researching new suppliers to introduce the jewellery and beading stock to the website soon - first order has gone in today for all the findings... so watch for it to appear shortly!
Have a lovely Easter!
Jane

Monday, March 29, 2010

More New Shoes!!...


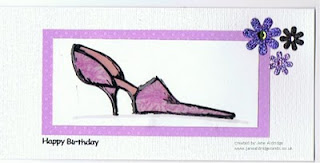
I've created this shoe with the same technique as yesterday's card - using the leafy corner again to give some pattern in the background. This time I've coloured in using a pink theme (Promarkers again) but to give it some pizazz - I went over the whole shoe with glossy accents. I added a final finishing touch of some glitter flowers from the Dazzlers range from Petaloo and a small peel-off greeting in black.
Happy crafting!
Jane

Sunday, March 28, 2010

Two Blue Shoes

Well I promised you shoe cards - and here is the first. I have created masks using sticky notes (a how to guide on how to do this to appear shortly!) and then stamped the two shoes using Memento Paris Dusk. This is a lovely colour to stamp in a dark purply blue. I've then created a mask so I can stamp using the leafy corner in the same ink colour. The beauty of these stamps is as they are clear, you can decide which part of the pattern you want where - so I could position the corner into the corner of the shoe which would allow me to later add a sparkly gem. I used the leafy part of the design to fill in the rest of the shoe and then repeated along the rest of this and the other shoe. I then coloured the shoes using Promarkers - sky blue for the main shoe, pastel blue for the inside of the shoe. I added a little shading with a grey promarker to add a little definition. I then cut out the shoes and mounted onto sandstone swiss dots bazzill card and then onto a blue mount with a final flourish of a vibrant blue ribbon.
Stamps used - Sketchy Shoe from Clarity (item 6530 on web) and Leafy Corner from Clarity (item 6511 on web)
I've got more promarkers on order at the moment which should arrive soon, so I'm looking forward to seeing all the latest sets!
happy crafting
Jane

Saturday, March 27, 2010

Bed Wars!!!


It had to happen. As soon as Barney decided to go eat his dinner - Molly spotted her opportunity. there's going to be trouble.....!

Cosy Kitty.....

Barney has never had a proper cat bed. In his younger days he wouldn't be seen dead in one!.... but we've noticed that in his 'middle years' he keeps nesting on anything he can find - a rogue jumper, a towel, my boxes of newly delivered stock!... so we thought we would buy him a bed. We took a chance that he would take one look and walk the other way... but no - he was straight in there pummeling away until he'd got the mattress scrunched up just how he wanted it - and he's not moved since! Let's just see if the novelty wears off or whether it's his new best friend!!. .. I've been busy playing with my Clarity shoe stamps today - so watch this space for a few different card ideas to appear during this week!
happy crafting!
Jane & Barney!

Simple .. but beautiful!

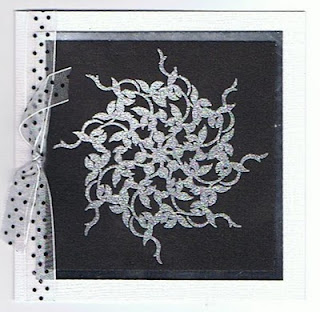
This lovely card has been made using the Clarity stamps honesuckle corner stamp. The corner stamps are fab and so versatile - you can stamp them in different patterns to create beautiful patterns, or side by side to create a border, they are also nice to use as a subtle background stamp with a delicate colour ink. I've stamped this one in VersaMark and embossed it using a silver sparkle powder which looks very striking on the black card background.
happy crafting!
Jane

Friday, March 26, 2010

Going all artsy!!


My friend Chris kindly lent me a whole box full of Clarity stamps (lucky me!!)... here's what I created using them. I've been inspired by a card I saw in the gallery on the Clarity stamp website! I've used sticky notes to mask off areas and applied Distress inks with a Cut n Dry foam and then stamped with a pattern stamp (I used the honesuckle corner) in the same distress ink, then finally stamped my main image over the top. Gradually build up your design by moving around your sticky notes. Inks used: Peeled Paint and Black Versafine on the first image, Broken China, Antique Linen with Walnut Stain to stamp the main image. Give it a go on an ATC - you can get some interesting effects! I think I might take these pieces back into the craft room and add some extra highlights with some glossy or crackle accents too.


happy crafting


Jane


Thursday, March 25, 2010

Spring Card...


My first entry to one of the Passion for Promarkers competitions (Spring Theme with an animal) - hope you like it! You can view all the other fab designs at their blog here http://promarkerchallenge.blogspot.com/
The stamp is from Wild Rose Studio designs as is the paper pack (florals).
happy crafting
Jane

Mmmmm yummy colours...!

Well I finally found the time to play with the new Cosmic Shimmer Misters and use them to create a colour chart. I always spray them onto white and black card as they can look completely different on the two! Particular favourites of mine are Bronze Blush - has a hint of green mica - lovely!... Blue lime - a lovely zingy lime ink with a hint of blue mica and also the stunning Red Firefly - a vibrant orangy red wiht a hint of gold mica. I think that the Angel Mist and Sunlight Mist will prove very useful - they don't look so much on white - very pale - but they'll be fab for sprizing over printed papers to give that element of shimmer!
I intended to blog earlier in the week - but I've been nursing my dog Molly this week who had her visit to the vets on Monday to be spayed. So I've had to keep an eye on her this week - but it did at least give me time to catch up with some paperwork (yawn...), and also get the new 12x12s onto the website too. I did attempt to start stocktaking the decoupage ready for the web.... but there's such a lot of them I didn't get very far!!
I'm now going to spend the rest of today crafting before getting together with some of my crafting buddies this evening - who are all itching to see all the new supplies!.... so I would imagine there will be a few projects I'll be able to blog over the next few days!
happy crafting
Jane

Monday, March 22, 2010

FREE P&P over £10!

Just a quick note to let you all know we have a special offer this week - we've lowered our free P&P limit to just £10!... so if you spend £10 or more you will have no postage costs! enjoy!
Jane

Saturday, March 20, 2010

Metal Squares with Alcohol Inks


Chris, Pauline and I had a fab time in our workshop this morning. We spent the morning playing with different techniques using metal sheets and alcohol inks and by the end of the morning all three of us had very inky fingers! Above is a picture & closeup of the card I created. It's a simple technique but very effective - cutting out shapes using the cuttlebug and then embossing an applying the alcohol inks. There are endless possibilities that you can create using this technique when you consider the different shapes and layouts you can do, the different colour metal sheets you can use, as well as different inks, whether to sand or add black ink highlights, use texture tools or rubber stamps too. I've created a full downloadable and printable project sheet to create this card and you can download it via 4shared by following this link. I would love to see any cards you create inspired by this project, post a comment back to this blog with a link to you picture, or email me a pic that I can post up for all to see!
happy crafting
Jane

Friday, March 19, 2010

Coastal scenes

Well I did promise the next project to be more artsy - so here are a some cards I've made using the Create-a-scene Coastal or Village sets and Distress Inks. I've really taken to the create-a-scene stamps. So far I've only got the Coastal and Village set in my collection - but I've made so many different cards from the sets. I like the flexibility that lets you decide how big you want your scene to be and also how complex. They also mix and match nicely too as you'll never find two elements the same on the sets - even the grasses and clouds vary on all the different sets. These cards have been stamped using Distress inks - an ideal companion for these stamps. Simple stamping in just one colour then drag a little of the colour using a waterbrush to give a little softness to the images and then perhaps a few touches of glitter or Stickles to add a little detail. Any of you who know me well, knows I can't stop at just one or two cards when I can post six... that involves deciding which two and how could I pick! In a future post I'll give more detail on how to achieve the background of my first card - a handy technique to know!

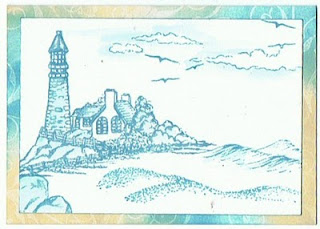


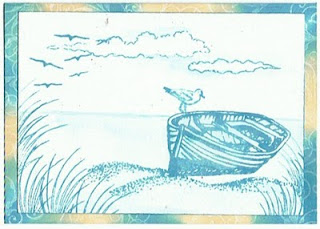
I've found a handy tip with using these stamps is to ensure that your elements are always touching something else. So rather than putting in a rock all alone, just touch it up against something, grass, sand, the boat, it seems to help with the perspective of your piece. Also when using the waterbrush, don't try too hard to paint in the detail, just a few strokes with the brush to spread the colour it sufficient to give it some body. The inks used here are broken china (the pale blue), aged mahogany (that lovely burgundy) and peeled paint (green). I hope it gets you inspired to give them a go - they are great fun!
happy crafting
Jane